ODK-X Sync Endpoint
ODK-X Sync Endpoint is an implementation of ODK-X Cloud Endpoints. It runs a server inside a Docker container that implements the ODK-X REST Protocol.
It communicates with your ODK-X Android applications to synchronize your data and application files.
There is an important library called Sync Client which implements the sync protocol by interacting with Sync Endpoint and other tools. The source of this library can be found in the ODK-X Sync Client GitHub repository. This is a library that can be used to execute the ODK-X sync protocol in Java applications.
Depending on your needs, ODK-X Sync Endpoint can either be installed in a cloud-based virtual machine, or on your own infrastructure.
Overview
ODK-X Sync Endpoint Server Technologies
ODK-X Sync Endpoint server is a combination of micro-services that run inside a Docker swarm The image below shows the six main micro-services that compose the functionality included in Sync-Endpoint.
To direct the incoming web request, the Sync-Endpoint uses nginx to route the web request to the proper microservice able to properly respond to the request. The central microservice of the Sync-Endpoint is a Java web application that provides the ODK-X REST synchronization protocol.
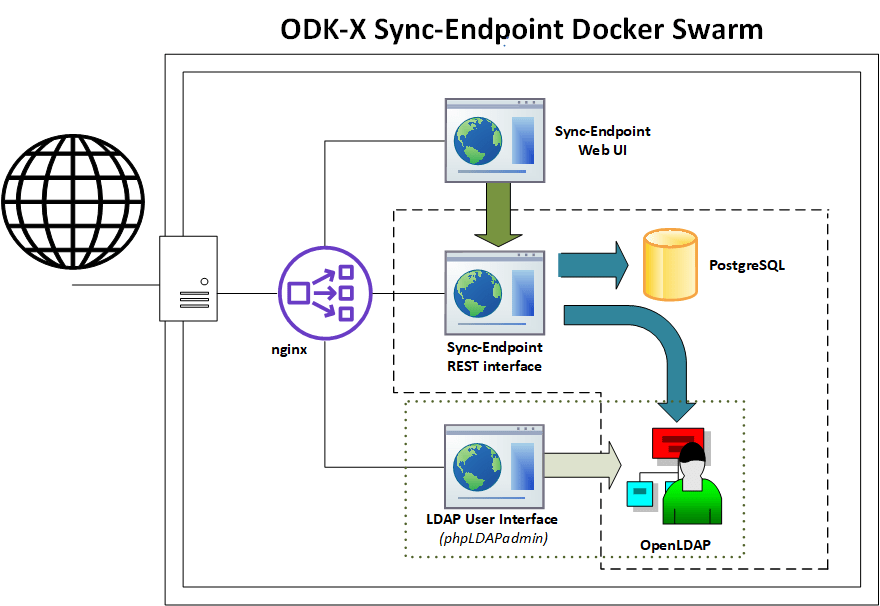
An architecture diagram of the six main microservices running in a Docker swarm. The six main microservices are: nginx, Sync-Endpoint REST Interface, Sync-Endpoint Web UI, PostgreSQL, phpLDAPadmin, and OpenLDAP.
The REST protocol microservice runs an Apache Tomcat webserver. By default, the Sync-Endpoint uses a PostgreSQL server running as a microservice; however, the endpoint is designed to integrate with other databases (e.g., MySQL). The Sync-Endpoint Web UI is the microservice that provides the user interface for the sync-endpoint server. Sync-Endpoint is also a Java web application running inside an Apache Tomcat webserver.
The Sync Endpoint REST server does not store user information in its own database; instead, it integrates with an LDAP directory (it can also integrate with other user management protocols such as Active Directory). The OpenLDAP microservice is used to authenticate users and obtain user roles. To give the system administrator a graphical interface to add/change/remove users and groups, the endpoint leverages the phpLDAPadmin web interface running as a microservice that presents a web user interface of the data in OpenLDAP.
ODK-X Synchronization Protocol
ODK-X’s synchronization protocol is based on a REST architecture that keeps the data on multiple devices synchronized to a master copy stored on the ODK-X Sync-Endpoint. Clients do not have to worry about losing data, as API requests can be safely repeated in environments where network timeouts occur.
To minimize data updates that conflict, data updates are processed as row-based changes to keep changes small. For example, when performing a cold chain inventory, if updates were at a coarse granularity, such as table-based or file-based, a conflict might be detected for two workers updating refrigerators while working at different sites. By keeping conflict detection at the row-level, multiple users can make updates to shared data tables, and the system will detect that there is not a conflict as long as the same row is not updated by different users between their synchronizations.
A conflict is defined as two users with different updates to the same row. ODK-X uses table locks on the server to ensure only a single change to a data row can occur at any time. When the runner-up client finally obtains the lock and attempts to alter the same row, the update will be rejected as a conflict. Once a conflict is detected, the user manually determines which version of data is correct between their pending changes on the local client and the updated data row on the server. The rationale for having the user who caused the conflict also resolve the conflict is that the user was recently working with data and is likely to have the necessary information and context on how best to resolve the conflict.
You can learn more here: ODK-X Sync Protocol
Authentication
ODK-X Sync Endpoint does not store user information in its own database, instead it integrates with an LDAP directory or an Active Directory. That directory is then used to authenticate users and obtain user roles.
Note
As a consequence of the integration, Basic Authentication is the only supported authentication method.
HTTPS
HTTPS stands for Hyper Text Transfer Protocol Secure. It is a protocol for securing the communication between two systems e.g. the browser and the web server. To learn more about HTTPS and how it works see this video Working of HTTPS.
The Sync Endpoint stack integrates support for automatic certificate provisioning via domain validation and letsencrypt. For most use cases this should be sufficient. Certificate provisioning parameters can be edited interactively during initialization or directly in
config/https.env. To learn about Certbot and letsencrypt visit this site Certbot.Tip
For advanced users, if you would like to use an externally provisioned certificate one can be added by modifying the cert-bootstrap service in
docker-compose-https.ymlto pull from the appropriate external files. Additionally docker's built in secrets and config infrastructure can be used directly to expose the certificate and key only to the NGINX container.In HTTPS, the communication protocol is encrypted using Transport Layer Security (TLS) or, formerly, Secure Sockets Layer (SSL). The protocol is hence also referred to as HTTP over TLS or HTTP over SSL. HTTPS signals the browser to use an added encryption layer of SSL/TLS to protect the traffic. SSL/TLS is especially suited for HTTP, as it can provide some protection even if only one side of the communication is authenticated. More information on TLS/SSL certificates is available here TLS/SSL Encryption.
LDAP
The default admin account is cn=admin,dc=example,dc=org.
The default password is admin - it can be changed with the LDAP_ADMIN_PASSWORD environment variable in
ldap.envThe default readonly account is cn=readonly,dc=example,dc=org.
The default password is readonly - it can be changed with the LDAP_READONLY_USER_PASSWORD environment variable in
ldap.env. This account is used by the Sync Endpoint to retrieve user information.
The LDAP directory that you deployed with the instructions above is an OpenLDAP server. In addition to the directory, a phpLDAPadmin server is also deployed to help you configure the directory.
If you'd prefer to use the OpenLDAP command line utilities, they're installed in the OpenLDAP container. These tools are accessible with this command:
Linux/macOS:
$ docker exec $(docker ps -f "label=com.docker.swarm.service.name=syncldap_ldap-service" --format '{{.ID}}') LDAPTOOL ARGS
Windows:
$ docker exec (docker ps -f "label=com.docker.swarm.service.name=syncldap_ldap-service" --format '{{.ID}}') LDAPTOOL ARGS
Note
The phpLDAPadmin server listens on port 40000, it is important that you do not expose this port to the internet or that you take steps to secure the web administration interface.
The following guides assume that you're using phpLDAPadmin. In order to perform the following operation, please go to https://127.0.0.1:40000 in your browser.
If you do not have access to the localhost (e.g. if you are installing the sync endpoint as a docker stack at a cloud provider) may want to enable web access by following the instructions in the LDAP Web administration documentation.
Recommended Creating a Sample User tutorial with images.
Advanced
Editing the defaults of LDAP Directory
Modify the
ldap.envfile to configure the environment variables. Theldap.envfile is located in the sync-endpoint-default-setup directory.The default settings are as follows
# openldap
LDAP_ORGANISATION=Open Data Kit            // name of your organisation
LDAP_DOMAIN=example.org                    // domain of your organisation
LDAP_READONLY_USER=true                    // enable the read only user
LDAP_READONLY_USER_PASSWORD=readonly       // password for read only user
LDAP_ADMIN_PASSWORD=admin                  // default password for admin account

# phpldapadmin
PHPLDAPADMIN_LDAP_HOSTS=ldap-service   // This is for the phpLDAPadmin. In Docker Swarm this is the hostname of the service running LDAP. This can be
                                          eddited in the docker-compose.yml file
Note
For LDAP environment variables the corresponding options in the security.properties also need to be modified. The security.properties file is located at config/sync-endpoint in the sync-endpoint-default-setup directory.
Using a Different LDAP UI
If you want to use a UI outside the Docker Swarm in your local machine Modify the docker-compose.yml file in sync-endpoint-default-setup directory. Add ports mapping to the ldap service to expose the port 389 of ldap service to a port in your local host. If you wish to access the ldap protocol over TLS/SSL expose the port 636. Connect the UI application to this port on localhost.
The ldap service of the the Docker compose should be like this after adding port mapping.
ldap-service:
 image: odk/openldap
 deploy:
  replicas: 1
 networks:
  - ldap-network
 ports:
  - "YOUR_LOCAL_HOST_PORT:389"    // 389 is the default port of openLDAP
 volumes:
  - ldap-vol:/var/lib/ldap
  - ldap-slapd.d-vol:/etc/ldap/slapd.d
 env_file:
  - ldap.env
Warning
The LDAP service running at any port will not only be accessible from the localhost but will also be exposed over the Docker ingress overlay network (which is exposed to the Internet in most cases).
For running the UI application in the Docker Swarm create a folder in the sync-endpoint-default-setup directory and create a Docker file inside it. Copy the templates folder from the phpLDAPadmin directory to the new directory. In the Docker file ,add the image of the UI application to be used and the "COPY" command to copy the templates folder to the right path inside the container.
To build the Docker image run the command in the sync-endpoint-default-setup-directory with tag odk/[YOUR_UI_APPLICATION_NAME]:
$ docker build -t odk/[YOUR_UI_APPLICATION_NAME] [ Folder conatining the Docker file ]Edit the docker-compose.yml file. Replace the image of phpLDAPadmin service with odk/[YOUR_UI_APPLICATION_NAME].
Managing Identity through DHIS2
In the sync-endpoint-default-setup directory navigate to config/sync-endpoint. Modify the
security.propertiesfile to fill in the Settings for DHIS2 Authentication section. Set security.server.authenticationMethod in security.properties to dhis2. After this the following settings need to be configured for dhis2.
security.server.dhis2ApiUrl
security.server.dhis2AdminUsername
security.server.dhis2AdminPassword
security.server.dhis2SiteAdmins
security.server.dhis2AdministerTables
security.server.dhis2SuperUserTables
security.server.dhis2SyncTables
security.server.dhis2FormManagers
security.server.dhis2DataViewers
security.server.dhis2DataCollectors
[OPTIONAL] Remove OpenLDAP and phpLDAPadmin from docker-compose.yml .
After restarting your Sync Endpoint server, you will be able to login to Sync Endpoint using the same credentials you use for your DHIS2 server. DHIS2 organization units and groups, with membership preserved, will be converted to Sync Endpoint groups and accessible through the Sync Endpoint REST API.
Warnings
The database and the LDAP Directory set up here are meant only for testing and evaluation. When running in production you should configure a production ready database and a production ready LDAP Directory. Using the pre-configured database and directory in production can result in poor performance and degraded availability.
You should refer to Docker Swarm documentation on running a production ready Swarm.
We recommend that you host Sync Endpoint on a commercial cloud provider (e.g. Google Cloud Platform, Amazon AWS, Microsoft Azure, etc.) If you want to host Sync Endpoint on premise, you should consult your System Administrator for appropriate hardware.
Always make regular backups and test your backups to prevent potential data loss.