ODK-X Suitcase
ODK-X Suitcase is a cross-platform tool that allows the user to upload, download, and update data on an ODK-X Cloud Endpoint from a personal computer.
Data downloaded from ODK-X Cloud Endpoints are stored as spreadsheets in CSV format. This format is compatible with most spreadsheet software, for example Excel or Numbers. Once downloaded, the spreadsheets will be available for offline viewing.
Similarly, in order to add, delete, or update data, the data to be uploaded to an ODK-X Cloud Endpoint must be stored in a properly formatted CSV file.
Prerequisites
Set up an ODK-X Cloud Endpoints
Note
Ensure you are using a compatible Cloud Endpoint from the same revision.
Make sure Java 8 or higher is installed on the computer you plan to use. If it is not, download and install it.
Installing ODK-X Suitcase
Navigate to https://github.com/odk-x/suitcase/releases/latest and download the latest
ODK-X Suitcase.jarfile.ODK-X Suitcase requires no installation and is ready to use.
Using ODK-X Suitcase
Graphical User Interface (GUI)
To use Suitcase GUI double-click the downloaded file to start it. If that fails, try running the following,
updating the path to where you downloaded the latest ODK-X Suitcase.jar file and
replacing jar.jar with the filename of the downloaded ODK-X Suitcase.jar.
$ java -jar path/to/jar.jar
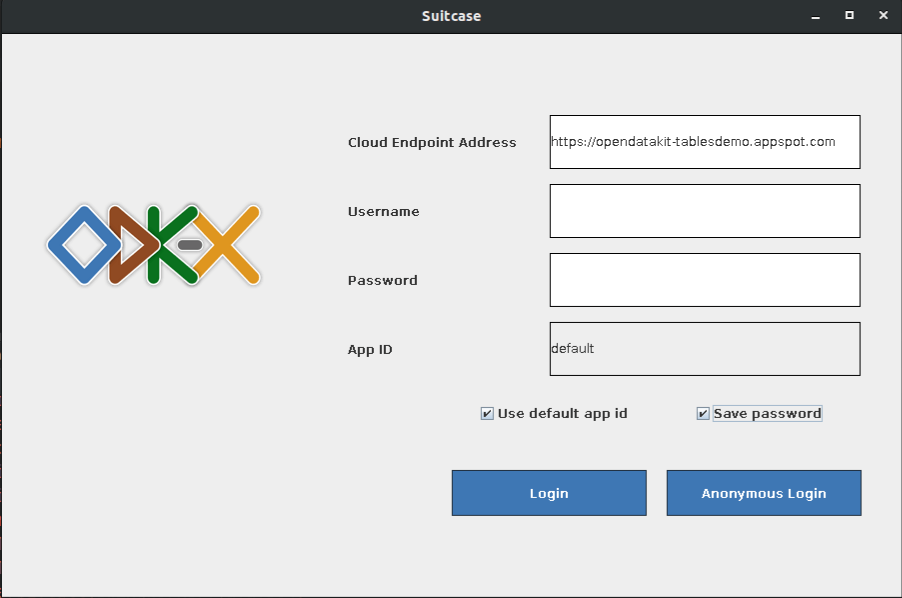
The first screen when you open ODK-X Suitcase will ask for your ODK-X Cloud Endpoint Address, the App ID, and your username and password. If your ODK-X Cloud Endpoint allows for anonymous access then you can leave the username and password fields blank. Otherwise, please specify an ODK-X Cloud Endpoint username and password with sufficient permissions.
Note
By default App ID = default,to use your own App ID uncheck the option to use default App ID, check the second paragraph of ODK-X Data Management Applications to see more details.
Suitcase remembers the last username and server url entered. You can check the save password option to keep yourself logged in when you open the application again. To log out of the application you can use the logout button in a menu on the top left of the application.
Screenshot of the login page:
- There are four tabs at the top of the graphical interface:
Download, to download existing data from the server
Upload, to upload new data to the server.
Update, to update existing data on the server.
Clear, to delete tables from the server. This tab also has the option to reset the entire server.
- Downloading from the server
When downloading, you will need to select the table_id to download from the dropdown. The dropdown will contain all the table_ids present in the cloud endpoint server. If you don’t see a table_id in the dropdown which is present in the cloud endpoint server click the Refresh Tables List Metadata button. After selecting a table_id in the dropdown you can click on the Add button to add the table_id in the list of selected table_ids for download. This way you can add multiple table ids for download at once. You can use the Add All button to add all the table_ids at once. If you want to remove a table_id from the selected list, you can click on the Remove button on the right side of the table_id you want to remove. By default ODK-X Suitcase creates a
Downloaddirectory where the ODK-X Suitcase jar file is located and saves the data to a CSV file underDownload/app_id/table_id/link_unformatted.csvthat has all of the data for that table downloaded from the server. To specify a different directory for ODK-X Suitcase to store downloaded data in, modify the Save to field or click on the … button.Screenshot of the Download tab:
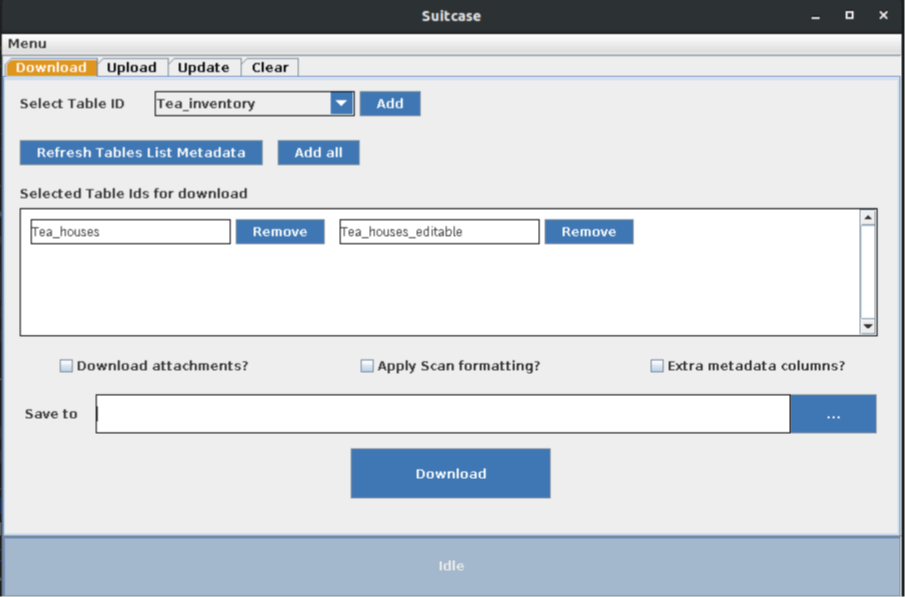
ODK-X Suitcase provides three options to customize the CSV file download.
Download attachments:
If this option is selected, ODK-X Suitcase will download all attachments from the given table and the CSV generated will contain hyperlinks to the local files.
If this option is not selected, the CSV generated will contain hyperlink to the given ODK-X Cloud Endpoint.
Apply Scan formatting:
When this option is selected, ODK-X Suitcase will optimize the CSV by replacing certain columns added by ODK-X Scan.
Extra metadata columns
When this option is selected, two more columns will be included in the CSV, create_user and last_update_user.
- Uploading to the server
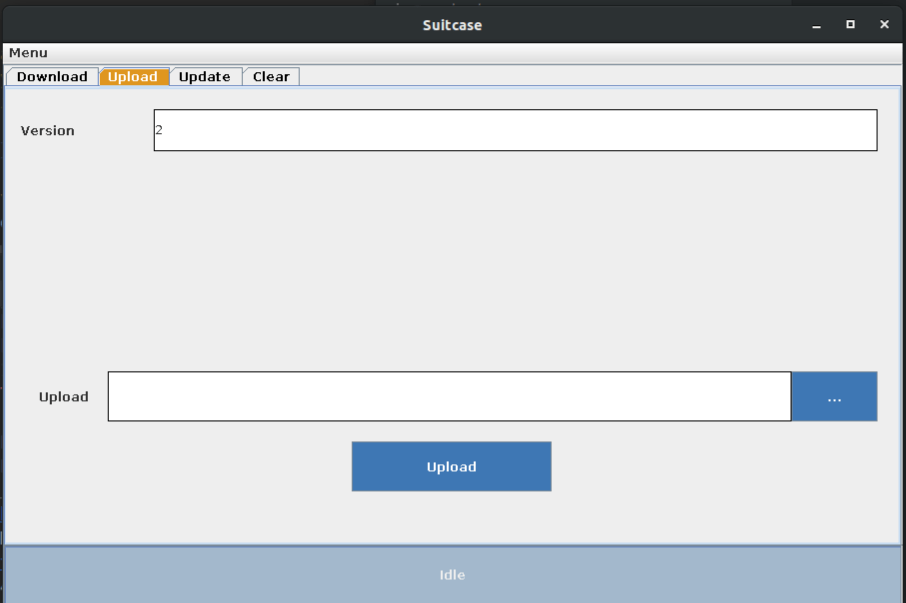
When uploading, you will need to specify the Version which by default is 2. By default ODK-X Suitcase assumes the upload field to be a
Uploaddirectory where the ODK-X Suitcase jar file is located to change it click on the … button.To Upload files to ODK-X Cloud Endpoint, you need to lay out the files and folders in the correct file structure which is described in details in the Application Configuration File Structure.
Your upload directory should look similar to the config directory and contain subdirectories assets and/or tables as shown in the Application Configuration File Structure. You can find an example of this in the ODK-X App Designer GitHub repository.
Then modify the Upload field to that file path by clicking on the … button, and then press Upload.
Screenshot of Upload tab:
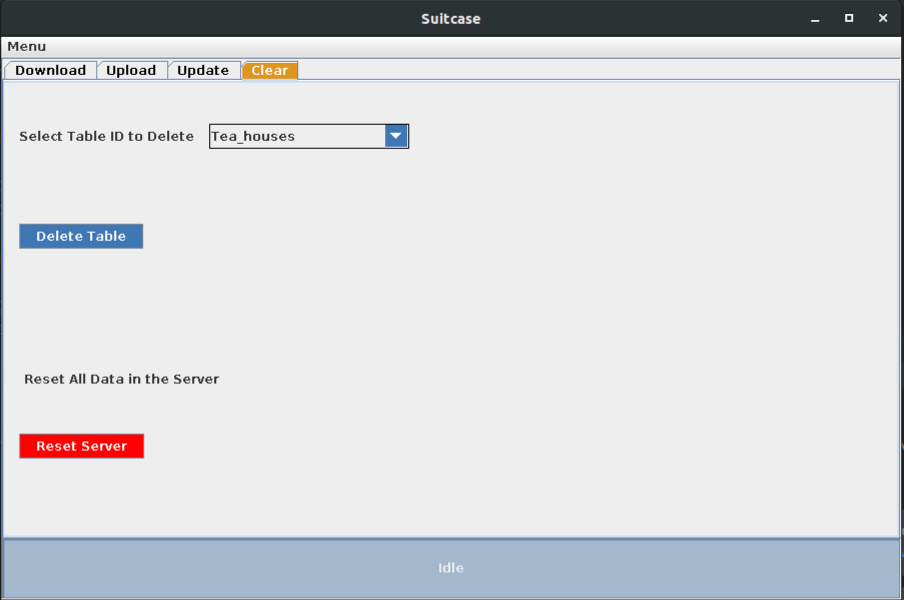
- Resetting the server
The Reset button can be found under the Clear tab. Clicking Reset will reset the the server after a warning and a confirmation.
Screenshot of Clear tab:
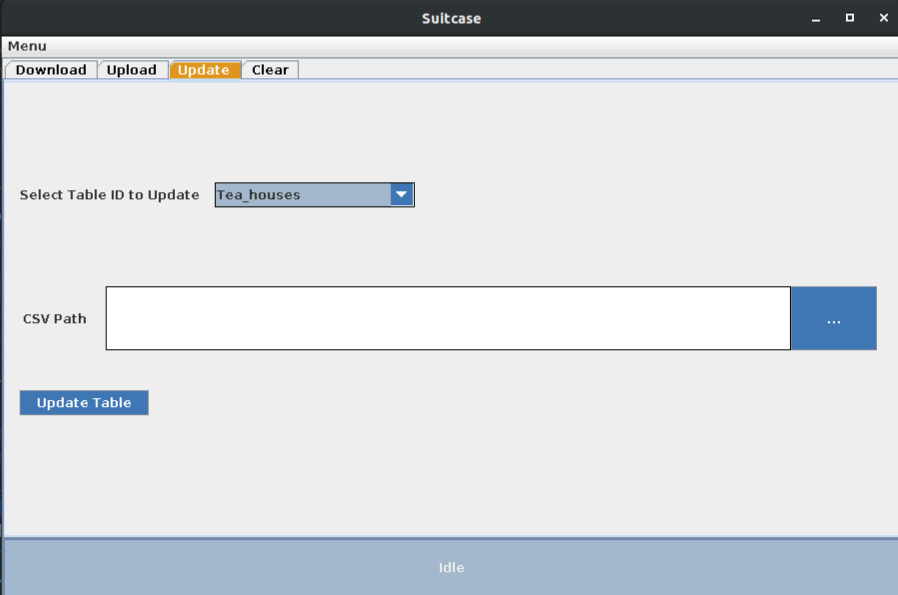
- Updating data in the server
The Update button can be found under the Update tab. Select the table_id to update from the dropdown. Open the file chooser by clicking on the '…' button and select the csv to be used for update. To update the data on the server you need a correctly formatted CSV – follow the instructions for Preparing your CSV for upload.
Screenshot of Update tab:
- Deleting from the server
The Delete button can be found under the Clear tab. Select the table_id to delete from the dropdown and click on delete. Selected Table ID will be deleted from the server after a warning and a confirmation.
Screenshot of Clear tab:
Command Line Interface (CLI)
ODK-X Suitcase also provides a command line interface (CLI) that can be easily called by scripts and other programs.
The CLI has all the features of the graphical user interface and some more. CSV files produced by the two interfaces are also be identical.
The CLI can be used for downloads, updates, uploads, and resetting the server.
For a list of all available options, open command prompt/Powershell or terminal.
Type the following, updating the path to where you downloaded the latest ODK-X Suitcase.jar file
and replacing jar.jar with the filename of the downloaded ODK-X Suitcase.jar.
$ java -jar path/to/jar.jar --help
- CLI commands
usage: suitcase
-a,--attachment             download attachments
-appId <arg>                app id
-cloudEndpointUrl <arg>     url to Cloud Endpoint server
-dataVersion <arg>          version of data, usually 1 or 2
-download                   Download csv
-e,--extra                  add extra metadata columns
-f,--force                  do not prompt, overwrite existing files
-h,--help                   print this message
-password <arg>             password
-path <arg>                 Specify a custom path to output csv or to
                            upload from. Default csv directory is
                            ./Download/ Default upload directory is
                            ./Upload/
-permission                 Upload user permissions using csv specified
                            by path
-relativeServerPath <arg>   Specify the relative server path to push file
                            to
-reset                      Reset server
-s,--scan                   apply Scan formatting
-tableId <arg>              table id
-tableOp <arg>              Create, delete, or clear tableId using csv
                            specified by path
-update                     Update tableId using csv specified by path
-updateLogPath <arg>        Specify a custom path to create update log
                            file. Default directory is ./Update
-upload                     Upload one file or all files in directory
-delete <arg>               Delete the specified table in server
-uploadOp <arg>             Specify the uploadop to either FILE or
                            RESET_APP.This option must be used with
                            upload option.RESET_APP is the default option
                            and will push all files to serverFILE is used
                            to push one file to relativeServerPath
-username <arg>             username
-v,--version                prints version information
Combine the individual commands described in the help to perform the actions needed. Examples are as follows.
- Downloading from the server
To download CSV of table table_id from app default as an anonymous user to the
defaultdirectory.$ java -jar 'path/to/jar.jar' -download -cloudEndpointUrl 'https://your-endpoint-server.com' -appId 'default' -tableId 'table_id' -dataVersion 2
To download CSV of table table_id from app default with attachments with username user and password pass to
~/Desktop$ java -jar 'path/to/jar.jar' -download -a -cloudEndpointUrl 'https://your-endpoint-server.com' -appId 'default' -tableId 'table_id' -username 'user' -password 'pass' -path '~/Desktop' -dataVersion 2
- Uploading to the server
Set up the Upload directory as mentioned in Suitcase GUI upload.
To upload files to table table_id of app default with username user and password pass from
~/Desktop/Uploaddirectory.$ java -jar 'path/to/jar.jar' -upload -cloudEndpointUrl 'https://your-endpoint-server.com' -appId 'default' -tableId 'table_id' -username 'user' -password 'pass' -path '~/Desktop/Upload' -dataVersion 2
- Updating the server
To update the data on the server you need a correctly formatted CSV – follow the instructions for Preparing your CSV for upload and use the following command to upload it to the server to table table_id of app default with username user and password pass from
~/Desktop/correctly_formatted.csvand save the log to~/Desktop/log.txt$ java -jar 'path/to/jar.jar' -update -cloudEndpointUrl 'https://your-endpoint-server.com' -appId 'default' -tableId 'table_id' -username 'user' -password 'pass' -path '~/Desktop/correctly_formatted.csv' -updateLogPath '~/Desktop/log.txt' -dataVersion 2
- Delete a table from the server
To delete table table_id from app default as a user with username user and password pass.
$ java -jar 'path/to/jar.jar' -delete -cloudEndpointUrl 'https://your-endpoint-server.com' -appId 'default' -tableId 'table_id' -username 'user' -password 'pass' -dataVersion 2
- Performing Table operations on the server
To clear the table table_id of app default with username user and password pass.
$ java -jar 'path/to/jar.jar' -tableOp 'clear' -tableId 'table_id' -cloudEndpointUrl 'https://your-endpoint-server.com' -appId 'default' -username 'user' -password 'pass' -dataVersion 2
To delete the table table_id of app default with username user and password pass.
$ java -jar 'path/to/jar.jar' -tableOp 'delete' -tableId 'table_id' -cloudEndpointUrl 'https://your-endpoint-server.com' -appId 'default' -username 'user' -password 'pass' -dataVersion 2
To create table table_id of app default with username user and password pass from
~/Desktop/table_definition.csv. The CSV file used should contain the definition of the table you are trying to create.$ java -jar 'path/to/jar.jar' -tableOp 'create' -tableId 'table_id' -cloudEndpointUrl 'https://your-endpoint-server.com' -appId 'default' -username 'user' -password 'pass' -path '~/Desktop/table_definition.csv' -dataVersion 2
- Resetting the server
To reset with username user and password pass.
$ java -jar 'path/to/jar.jar' -reset -cloudEndpointUrl 'https://your-endpoint-server.com' -appId 'default' -username 'user' -password 'pass' -dataVersion 2
To script the CLI, write the commands you would like to execute in a scripting language (for example, Bash, Batch, Python, Ruby) and
use a scheduler (such as Cron or Windows Task Scheduler) to schedule the tasks.
To skip over ODK-X Suitcase's prompts to overwrite, pass -f as an argument to ODK-X Suitcase.
Tip
If your data are collected in a language that uses UTF-8 coding (for example, Arabic) you will need to add -Dfile.encoding=UTF8 to the command line to open ODK-X Suitcase
Preparing your CSV for upload
In order to add, delete, or update data on the ODK-X Cloud Endpoint, you will need to create a CSV. You will need a separate CSV file for each table_id and these CSV files need to be named table_id.csv
The first column of the CSV must have the header operation. The value in the operation column instructs ODK-X Suitcase how to handle that row. The valid values for this operation column are: UPDATE, FORCE_UPDATE, NEW and DELETE
UPDATE is used for updating data that already exists on the server. The update is done by matching on the _id column. The _id for an instance can be found by downloading the data using ODK-X suitcase.
FORCE_UPDATE is used for updating data with a more aggressive strategy, if -UPDATE failed.
NEW is used for adding new rows (instances) to the server
DELETE is used for deleting rows (instances) from the server by matching on the _id column.
The CSV file must also include _id and _form_id columns. If you are updating particular variables in the server, the column headers for the variables you are updating will also need to be added with the edited values.
An example of a CSV to upload:
operation |
_id |
_form_id |
age |
|---|---|---|---|
DELETE |
1201 |
students |
|
UPDATE |
1423 |
students |
17 |
NEW |
1533 |
students |
You can then use either the command line or the graphical interface to upload the CSV and update your data on the ODK-X Cloud Endpoint.
Tip
Using ODK-X Suitcase to download a CSV from your server and modifying that CSV can provide much of the structure and data you need for your CSV upload.