Using ODK-X Scan Form Designer
Getting Started
After Launching the Application Designer, find the Scan Form Designer inside a tab (see the ODK-X Application Designer Overview for a tour of all the tabs).
Warning
You must use Google Chrome; other web browsers are not compatible at this time.
The Scan Form designer presents a default page, the toolbar across the top of the screen, and Form Properties in the gray editing area surrounding the the page.
Tips for Increased Accuracy
Adding images, especially high resolution images, to your form will provide increased reference points for Scan to help with aligning the form. Adding labels as images, as opposed to text fields, can help improved the accuracy of your scans.
Fields stretched across the page are more likely to appear curved or warped in the photo taken by Scan, and the misalignment can lead to recognition errors. Ideally, each field should only be a few inches wide.
Similarly, large sized numbers can also appear stretched or misaligned; small to medium sized numbers are recommended with 2pt spacing between each digit is recommended.
Fill-in Bubbles can be slightly more accurate than Check Boxes.
Ink pens are recommended over pencil when users are completing your printed form.
You don't need to worry about leaving space for a printable border, Scan will automatically create a border around your form template.
Currently Scan is capable of reading one-page, one-sided forms, so the Form Designer will only allow you to create one-page, one-sided forms.
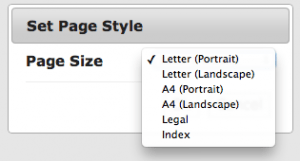
Set the Page Style
You must select the page style you want before you add any images or field boxes. You cannot change the page style later.
Warning
If you switch the page style later everything will be cleared to the default (blank!).
Choose your page format from the toolbar by selecting . The options for page style are:
Letter portrait
Letter landscape
A4 portrait
A4 landscape
Legal portrait
3x5 index card
Form Properties
In the workspace to the left of the form you are creating is a box titled Form Properties. This is were you can tailor each field for style and for establishing how the data will be organized and presented after it is scanned and digitized. The key properties to note at this point are:
Name: An identifier for the ODK-X tools back end. A name is generated automatically but can be customized if desired. No spaces allowed; if blanks are entered (for example: "Date mo 1" it will be saved with underscores (for example, "Date_mo1"). If desired, the name can be the same as the display text.
Display Text: A label for the field that relates the nature of the data input and will be a reference point in Survey when looking at the data answers after collection (for example: "PolioVaccDate"). If desired, this can be the same as the name. The display text can include spaces if desired.
Verify field: Choose whether the field requires validation by the user reviewing the scan when transcribing in Survey.
Order of fields: Enter the order that the fields will be presented to the person verifying each field of data in Survey. Provide order by listing number, for example: 1, 2, 3.
Select Update Field to apply any changes.
Adding Images
Anchor Images
You'll find that the default starting page of the Form Designer has images in each corner. These anchor images act as fiducial markers, or points of reference for the ODK-X Scan app when the form is eventually photographed with ODK-X Scan. Points of reference help the app orient the form so it knows which fields on the paper form correspond to the fields in the digital template. Additionally, any typed text fields that you added to the form will be viewed as images by the app and give the app additional points of reference to orient the form for processing.
Note
Anchor images are essential for accurate Scan readings
You can customize the anchor images with your own images:
Delete the preloaded anchor images by Deleting Field when the image is selected, and follow the instructions below on how to add new images.
Each corner's anchor image must be unique, and the higher the resolution the better.
Add Images
To begin adding images, you must first be working on the image layer. From the toolbar, select .
Choose the image from your computer by clicking New Image. The image will appear in the image workspace area to the right of the form you are editing.
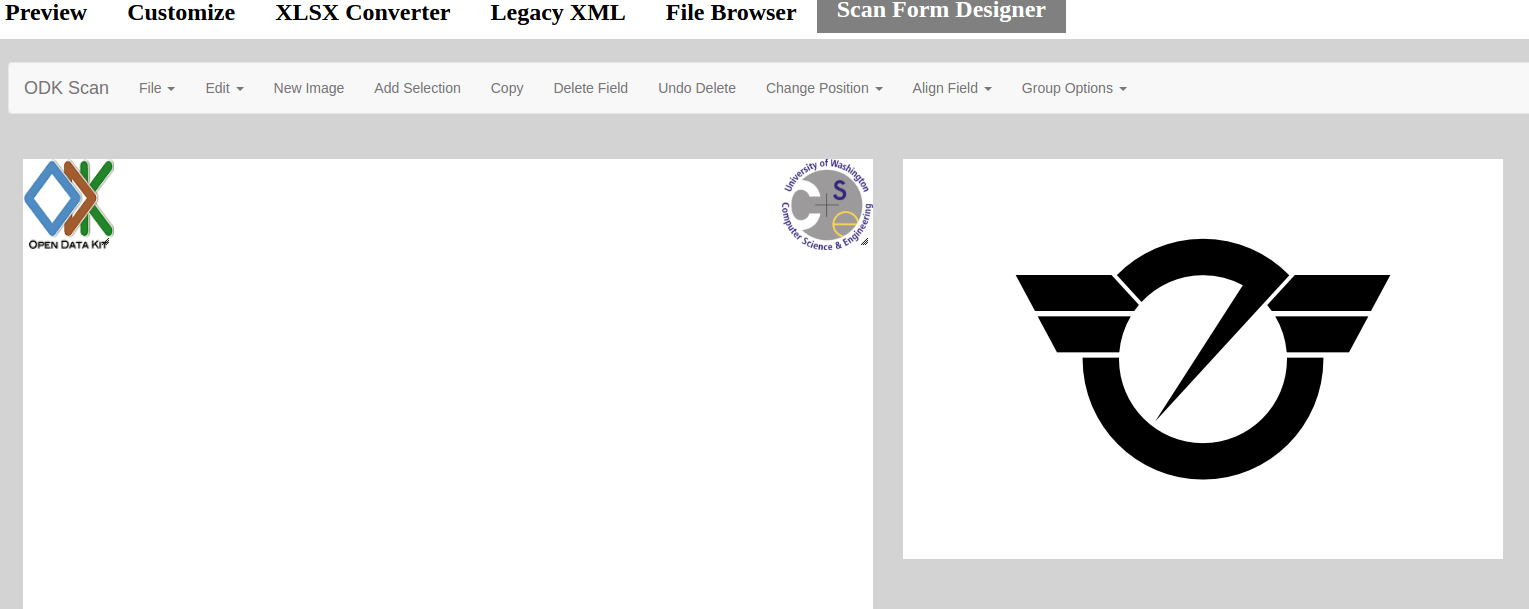
Use cursor to select the area of the image you want to use; this can be resized later.
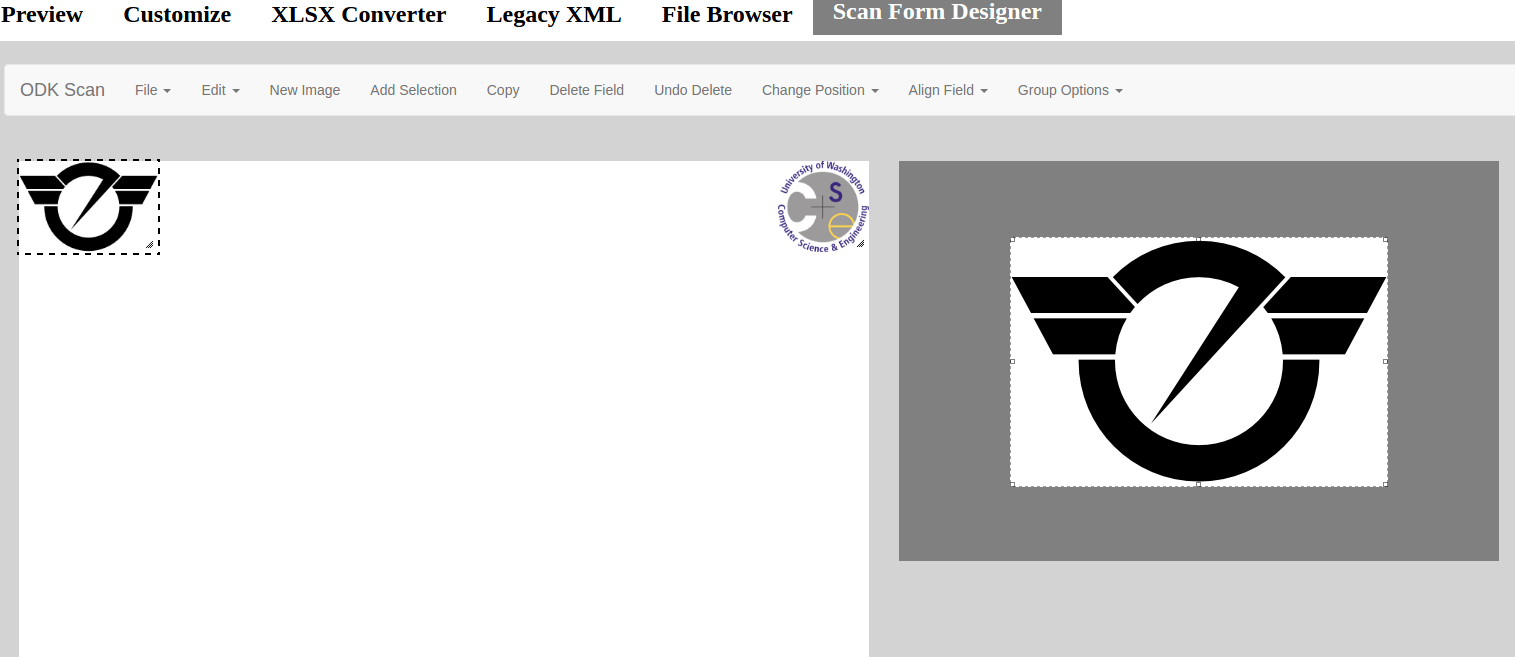
Add Selection
Selected image will be placed in the upper left-hand corner of the editing layer workspace. Drag the center of the image to place it where you want on the form, and the corners of the image to resize it.
You can keep adding selections from the same image while in Image Layer mode.
Return to to add more fields.
If you return to to add more images, you will see the previously uploaded files in the righthand corner of the workspace. Click on a file to quickly load the image for selection.
Uses for Images
In addition to customizing the anchor images on your form and adding additional points of reference to guide the ODK-X Scan app, you may also want to use images to:
Add a logo or picture
Add tables or charts to the form
You want to add text without typing it out in the Text field of the form designer. This is helpful if you are working off an existing form and do not want to retype all of the text from the form. You can grab images of the text instead and upload it to use in the form designer.
Adding Data Fields
To begin adding data fields, you must first be working on the Fields layer by selecting from the toolbar .
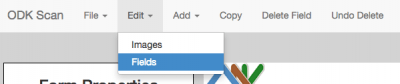
There are seven different field inputs that are supported by the ODK-X Scan Form Designer. Two of these field do NOT support digitization:
And five allow for automatic digitization
To add a field, select . Once you've added a field, the field will appear in the top left section of the form. You can then drag and drop the field to the placement you want on the form, as well as shrink or expand the field by pulling the corner.
Text Box
This will be a blank field where users will write in information. In the scanning process, text boxes capture an image of what has been written in the box, but they do not automatically digitize the letters.
Note
To digitize a text box, a user will manually transcribe the image of the text box into a text prompt in ODK-X Survey.
Text
This is one way you add typed text to a form. Text fields are not an input field for users and will not be digitized by scan, but act more as labels for fields that will be automatically digitized. Text fields also help ODK-X Scan orient the photo of the scanned form to the template file by providing additional points of reference.
Tip
Another way to add typed text to a form is as an image.
QR Code
A matrix barcode that can contained encoded numbers, words, or other data.
When a form with a QR code box is scanned, the ODK-X Scan App will process any QR code data inside that area. This is designed for a process such as placing a unique patient ID code sticker on a printed form and then using the ODK-X Scan app to automatically link the encoded data with the other data elements on the form. The only stipulation is that the QR code must fit inside the box whose size you specify in the form designer.
To create a custom QR code, you can use an online QR code generator, such as these example: QR Code Generator or QR Stuff.
Once you have a QR code saved as an image, you can add it to your form like any other image file. See Adding Images for more information.
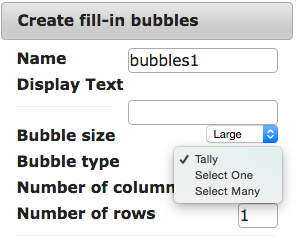
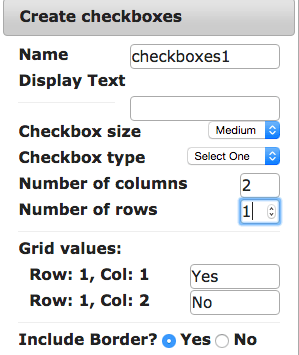
Checkboxes and Fill-in Bubbles
For ODK-X Scan, Fill-In Bubbles and Checkboxes have the same functionalities and options; they only vary in how they look.
Note
Fill-in bubble option results in slightly more accurate scan results than similar checkboxes.
With checkboxes or fill-in bubbles there are a few additional elements to consider in Form Properties.
Bubble Type
- The Bubble type field allows you to select how to categorize and count user entries.
: Filled bubbles will be read by ODK-X Scan as one unit each and will be added up to result in a number value. Each filled bubble/checkbox is one tally mark. (for example, one filled bubble for each child vaccinated).
: User chooses only one answer to the prompt. (for example, Male or Female).
: User chooses all applicable answers. (for example, Reasons for extra care: Low birth weight, family history of infant death, twins…).
Grid Values
Grid Values are the values designated to each bubble or box. The default value for each bubble or box filled in by the user is 1, and you can customize the answers ODK-X Scan attributes to each box or bubble. For example, if in a grid of one row and two columns, row 1, col 1 is given the value of "yes," when that box is marked by a user in Survey and Tables the digitized answer will be "yes."
Number and Formatted Number
The Number field is to add a number input that does not need any special formatting (for example, it's not a date, decimal, or a number split up by a dash). It is what you should use for things like number of polio vials in stock, age of child, and patient ID number.
The Formatted Number field has an option for digits to be split up by delimiters, allowing you to create a date, decimal, and dashed-number input. This is what you should use for things like date of registration and infant weight, and for anything like a serial number or refrigerator product code where the number is broken up by a dash.
Note
How to Write in Numbers
When a person fills out a number field they will be asked to write in the digits by connecting the appropriate dots in each box. The digits will end up looking like the numbers on a digital clock.
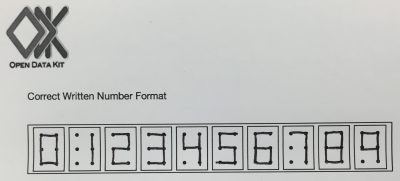
Warning
Scan's accuracy for number digitization is not as high as it is for the other fields. Bubbles and checkboxes have been tested at 99% accuracy in the field, but number accuracy can dip into the 80s or worse depending on form design and field conditions.
If you plan to use numbers in your form, be sure to review the Tips & Recommendations section and test your form in field conditions.
Group Options
At the far right of the toolbar is Group Options, which allows you to create subforms. With subforms you can link several fields together, useful when wanting to move multiples fields around your form at once and keep them together
While holding the Shift key, select all the fields you want to group together.
From the toolbar, select .
A dialog box will appear asking to confirm that you want to make a subform. After selecting Yes, you will need to name this subform.
If you need to ungroup fields, with the subgroup selected, from the toolbar select .
Save & Export the Form
Save Incomplete
If you are working on a form and wish to save it for future editing, go to to save the .zip file to your computer.

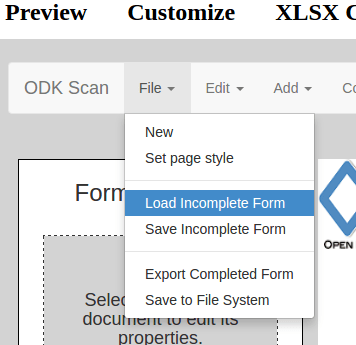
Load Incomplete
When you return to continue working on a saved form, go to File > Load Incomplete and select the .zip from your computer. Make sure it is still in the .zip format and is not an unzipped folder.
Warning
Always make sure to SAVE your form this way, even if you are also exporting or saving to file system. This is the ONLY way to reload a form if you want to make changes. The exported file will NOT work if you try to load it back into the form designer.
Save to File System
Once your form is complete, you are ready to generate the machine readable files. Go to . Give the file the name you will want to see it called in the app and in Survey and Tables, as you will not be able to change this name later.
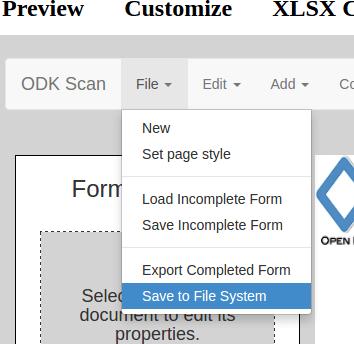
This will generate the JSON template file, JPG form photo, and all other files necessary for the Scan app to read and process your forms. It will save them to the application file system, which can be pushed to the device using Grunt with the typical command for pushing your app to your device (performed inside the Application Designer directory:
$ grunt adbpush
Warning
Saving to the file system does NOT save a version that can be edited later. Please use the Save Incomplete function to get an editable file.
Export Completed Form
If you would prefer to export your Scan machine readable files externally from the file system, you can use this option. Go to . Give the export file the name you will want to see it called in the app and in Survey and Tables, as you will not be able to change this name later.
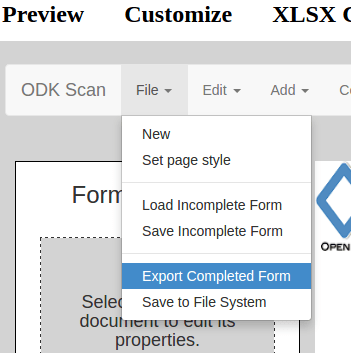
This will give you a .zip file that you can unzip and use to print hard copies of your form and transfer your form .json template to the ODK-X Scan App.
Note
This step is NOT necessary. Most people will use the "Save to File System" option.
Printing the Form
After you have saved and exported your form, print hard copies for your user to complete.
From the location you saved it on your computer, unzip the exported file.
Within the folder, find and open the file called form
.jpg. This is the image of the form that you created in the Form Designer is the form you will print to hard copy.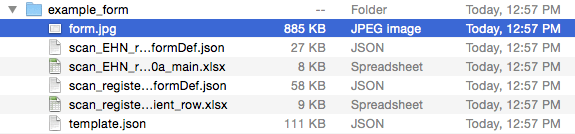
Print the entire image on one page. Black and white is fine even for forms that were created with colored elements.
Tips & Recommendations
General
Use only Google Chrome to access the form designer! Other browsers are not compatible and may cause you to lose the form you're working on.
Make sure your browser zoom is set to 100%. Zooming out can cause the data fields to appear weird on the form.
Do not refresh your browser without first saving your form – the form will be reset to the default blank form.
The Copy function, can be an easy shortcut if you need to create multiples of the same field. This could be useful, for example, if on your form you want to collect the date of birth for each child in the family, or need to create multiple entries for dates of treatment.
With the field you want to copy selected, go to Copy on the toolbar, and the new field will appear in the top left of the form. Edit any of the Form Properties as needed.
Grouping fields together can be a shortcut when needing to move multiple fields around as you're working on your form; instead of moving them one at a time.
You can both Delete and Undo Delete for fields and images from the toolbar.
Design Considerations
Currently Scan is capable of reading one-page, one-sided forms, so the Form Designer will only allow you to create one-page, one-sided forms.
Numbers left blank will be recognized by Scan as "" (the empty string).
Therefore, if for instance you have a field that can have a range in the number of digits (for example, like Patient ID Numbers where one patient's ID could be 5 digits long, and another's 7 digits) create a text field to give your user instructions to leave any blank digits at the front of the field, so that those blanks will not not alter the final value interpreted by Scan.
Since Scan cannot digitize handwriting, and text will have to be manually typed in when verifying the data set, if the form you are basing your template on is text heavy think creatively and strategically about the ways you can use bubbles or checkboxes instead.
For example, instead of asking users to write in their symptoms, you can provide bubbles for the most common symptoms, and leave a Text Box for anything not listed.
Repeat formatting for forms with multiple sections to make it as easy as possible for those writing in information to navigate the fields and the form. For example, place labels in the same position for each field, group subsections close together and create borders around them, and so on.
Think through the order that users will be collecting information and try to best replicate that in the order that fields are presented on the form.
For example, if the person completing the form will ask about the child's age before asking about the vaccines they have had (or if you want them to ask about age first), place the number field for age earlier in the form's progression than fields for the vaccines.
Be strategic about when using fill-in bubbles or checkboxes. To not confuse your user, it is best to use just one type on the form. Alternatively, you can use both to signal the different types of responses that can be given; for example, use fill-in bubbles for all of your select one questions, and checkboxes for select many, to signify to your user that they are being asked a different type of question.
Fields by default are created with borders. In the Form Properties box you can change the thickness of borders, number of borders, as well as the margins surrounding the fields.
Use the arrow keys on your keyboard to move selected fields more exactly.
You can align fields relative to each other by holding down Shift to select multiple fields at once, and then go to Align Field to select the alignment you want for the selected fields.
Using the Change Position function, located on the toolbar, if fields are placed close enough that they overlap, by sending one field forward or backward, you can overlay them to best fit your form.