If you're encountering the "You must use a Chrome or Safari browser" error when running the ODK-X Application Designer, you are not running the latest version - please update to v2.1.11
This will walk you through the steps of building a Data Management Application from scratch. The goal is to start with an empty folder and show you the necessary steps to create a working application that runs on your Android device.
The ODK-X Android tools (ODK-X Survey, ODK-X Tables, ODK-X Services) are Android Application Packages (APKs) that are designed to work together to create a coherent tailored application experience for an end-user.
Note
Together the ODK-X tools create a platform, on top of which you can build your own data management applications.
ODK-X tools access configuration files and store data under sub-directories of the opendatakit directory in the sdcard root directory (whether your device has a physical SD card or not): /sdcard/opendatakit. User applications constructed using the ODK-X tools are identified by the name of the sub-directory holding those configuration and data files. Thus, /sdcard/opendatakit/mytestapp would contain all the files and data for the mytestapp application, where mytestapp, is the AppName of that application. The default AppName for the ODK-X tools is default. However, when configured appropriately, the ODK-X tools can run under another AppName, accessing configuration and saving data in a different subdirectory under opendatakit.
This is handled in such a way that each user application is isolated from all other user applications, with separate configurations, data tables, and server settings. This allows one device to run multiple user applications built on top of the ODK-X tools without any coordination among the teams developing those applications.
Your freshly installed copy of Application Designer comes with lots of example forms, tables, and configurations. This is useful for learning the tools and as reference when building our application, the files can be found in the app/config/tables directory.
After building your own application, you may choose to delete all the example forms and configurations before pushing your files to your device. The files can be very large and take up a lot of space on the device.
To delete all the example forms and configurations, open the terminal and type grunt empty, this removes all the files and creates an empty app-designer folder to work with.
When creating a new form, the appropriate directory structure must be created. Once this directory structure is in place, a .xlsx form can be created. From this .xlsx form, a formDef.json file will be generated using the XLSX Converter. This formDef.json, in the appropriate directory, is what the system will use to create the Survey form.
New forms must be placed under the app/config/tables/ directory as described in the The app/config/tables/ Folder section. Given a form with the name formId, it will have a tableId of the same name unless you explicitly specify otherwise. The directory structure that should be created is app/config/tables/tableId/forms/formId (where, under many circumstances, the value for tableId will be the same as the value for formId).
Navigate to app/config/tables/ and create a folder with the tableId, where tableId is the name of your new form and table. For example, to create a census form, the folder would be named census.
In the census folder, create the following new folders:
forms
html
js
This creates the required directory structure for an individual table, including the forms directory.
Navigate into the forms directory (app/config/tables/census/forms/ in our example), and create a directory with the form ID as its name. For our example, create a app/config/tables/census/forms/census directory. Within that directory, ODK-X Survey expects to find the formDef.json that defines the form.
Tip
We recommend placing the .xlsx file used to generate that formDef.json in this folder as well. Survey will not use this file, but it is a useful reference and provides an easy-to-remember storage location in case the form needs to be updated in the future.
Any custom screen, prompt templates, or other media related to the form should be also placed in this directory (or in a sub-directory).
With the proper directory structure in place, you can now create your form. The ODK-X XLSX Converter documentation extensively details the full range of options, settings, and features available when creating a form. For this basic example, follow these instructions:
Create a new file census.xlsx inside the app/config/tables/census/forms/census folder created in the previous section.
Create a settings worksheet. This sheet holds general settings for the form. Create the following headers:
setting_name: has defined options, such as form_id.
value: the value of the named setting.
display.title.text: the text shown to the user inside Survey.
Reminder: the settings worksheet, and any other worksheets to be defined later, are to be created within the .xlsx file you created above. DO NOT create separate .xlsx files for each worksheet.
With this .xlsx file, you've created a simple Survey form that will ask the user to type in their name and respond whether they are 18 years old or not. This form will be titled Census and it will write to a table in the database with table ID census.
The framework.xlsx file is central to the structure of the Application Designer. It defines which forms exist. It has no persistent data. In this case, it only presents a list of forms and allows you to open them.
Navigate to the following existing directories: config/assets/framework/forms/. Inside that folder, there is a framework and framework.clean folder, as well as other folders that are not as important for this process.
Delete the existing framework folder. The framework.clean folder contains a framework.xlsx file, the file contains the boilerplate worksheet structure that you'll use to create a working framework.xlsx file for your application.
Rename the framework.clean folder to framework
The initial worksheet of framework.xlsx should have a header: clause and value do section survey.
Next, there is a framework_translations sheet. This sheet allows you to translate or customize the text displayed in buttons, messages, and other system text. Translations for your form would be specified in its own translations sheet in its .xlsx file. This worksheet is already populated, you do not need to edit this worksheet.
The choices sheet contains the following headers: choice_list_name, data_value, display.title.text.
Substitute the form_id_here under the data_value with the form_id and form_title_here under the display.title.text with the form title. The row should look like the table below:
To add another new form to an existing framework.xlsx file, take the following steps.
Note
These steps are not part of the running example. They are provided here for reference.
Assuming you have created a testForm.xlsx, the appropriate directory structures for testForm.xlsx, and then properly generated and saved the formDef.json, the following lines would need to be added to the framework.xlsxsurvey worksheet.
The changes to the choices sheet add the testForm form as one of the choices that is shown in the user_branch prompt (a user-directed branching prompt type). The changes on the survey sheet add a branch label, testForm, that matches the data_value from the choices sheet (this branch label will be jumped to if the user selects the testForm selection on the user_branch screen). The new branch label then renders an external_link prompt type that has the necessary arguments to open the testForm.
Note
You should run framework.xlsx through the XLSX Converter to save the changes, as the framework.xlsx should be converted again to include the latest changes.
Once you have saved your .xlsx file, you can use the XLSX Converter to create a formDef.json. Make sure your Application Designer is running (see Launching the Application Designer) and navigate to the XLSX Converter tab. Drag the .xlsx form or select it with the Choose File button and use the Save to File System button to save the form definition file back to the file system.
For the ongoing example, convert the app/config/assets/framework/forms/framework/framework.xlsx using the instructions above. Then repeat this process with app/config/tables/census/forms/census/census.xlsx
Warning
The Save to File System button uses the form_id and table_id within the .xlsx file to identify where to write the formDef.json file. If you have copied the .xlsx file from some other location and forgot to edit it, it may update back to that older location! If the form_id is equal to the table_id, two additional files are written that define the table's user data fields and that define the key-value properties for the table.
Once you have made these changes and used XLSX Converter on the framework.xlsx file to update the app/config/assets/framework/forms/framework/formDef.json file, you should see your new form show up in the Preview tab of the Application Designer. Clicking on that should open your form.
Tip
If you don't see your form in the Preview, try refreshing your browser.
Tip
You can also convert your forms with the Grunt command:
The XLSX Converter should report most problems with your survey.
If the form is not being rendered correctly but your survey generates a formDef.json without an error, first try purging the database (dropping all the existing data tables) using the Purge Database button on the Preview tab. You will typically need to purge the database whenever you add or remove fields from your form or change their data type.
If that does not resolve the issue, try stopping the grunt command (on Windows, Control-C should produce a prompt asking to confirm whether to stop or not. On Mac, Control-C kills the process with no prompt.), and re-running it. Grunt can sometimes get overwhelmed with changes and stop working. After restarting, test your form.
If there are other problems, the contents of the JavaScript Console will be helpful to the ODK-X core team for debugging. Open the JavaScript Console by clicking the icon with the three bars in the top right, select More Tools, select Developer Tools, and then select the Console tab. Select all of the debugging output, then copy it, save it to a file, and post it to the ODK-X Forum or create a ticket on the Github Issue Tracker.
You must have USB debugging enabled on your device in order to perform this step. See these instructions for help.
In order to see these changes on an Android device, you must first have ODK-X Survey installed on your device. Then:
Connect the device to your computer via a USB cable
Open a cmd or terminal window within the Application Designer directory (the one containing Gruntfile.js), as described in the Application Designer Directory Structure documentation.
Type:
$ gruntadbpush
Note
If it gives you an error, you may need to run gruntadbpush-f to force it.
This will copy all of the files under config onto your device. You should then be able to launch ODK-X Survey, and it will display your form in its list of forms. Click the form to open it.
One of the most powerful aspects of ODK-X Tables is its ability to run HTML and
JavaScript pages as the skin of the app. Through a JavaScript API presented to these files, you can query the database and control the app.
Writing an app using HTML and JavaScript yields a lot of power. However, it can lead to a complicated design cycle.
The HTML and JavaScript files you write rely on the JavaScript API implemented within the ODK-X Tables APK to retrieve database values for your application. This JavaScript API, since it is implemented in the APK, makes it difficult to debug your custom views off the phone. At present, the only way to test your HTML pages is on the device. Fortunately, on Android 4.4 and higher, Chrome can access the browser Console and set breakpoints on the device, providing a clumsy but viable debug environment.
In the first line, you are making the Bootstrap styles available to your code. Bootstrap is a free and open-source CSS framework directed at responsive web development. In the next three lines, you are adding the odkCommon, odkTables, and odkData objects if they are not already provided by the browser environment. When running on the device, the ODK-X Tables APK will provide these, and the contents of these files will be ignored. When running in Application Designer on your computer, these files provide the approximate functionality of the APK, allowing you to create and debug your scripts. However, at the moment, these implementations make use of RequireJS, which the ODK-X Tables HTML files do not use (RequireJS is extensively used by ODK-X Survey). This causes these to break in Application Designer Previews.
To write your own file, first, decide on the tableId for your table and create the directory structure as shown in Creating the Directory Structure. If you completed the example in ODK-X Survey: Designing a Form you have already done this for the census survey form.
For this section, we would be looking at the example List and Detail view of the Skip Logic survey form.
Note
These files need content from your data table to display. It is recommended that you first design a Survey form (for example, using this guide) which you can use to populate data. You can also prepopulate data into the database with a tables.init file. Further instructions are available in the Configuring an App at Startup guide.
This HTML file should be minimal. It links all the source files and provides <div> to put the list in. Most of the work happens in the JavaScript file. Open the app/config/tables/SkipLogic/js/SkipLogic_list.js file. Its contents should look like this:
/* global odkTables, odkData */'use strict';(function(){varopenDetailViewOnClick=function(rowId){returnfunction(){odkTables.openDetailView(null,'SkipLogic',rowId);};};varlistViewCallbackSuccess=function(result){varresultCount=result.getCount();vartemplate=document.getElementById('skipLogicListTemplate');varlistContainer=document.getElementById('skipLogicList');for(vari=0;i<resultCount;i++){varlistItem=document.importNode(template.content,true);listItem.querySelector('.skip-logic-list-name').textContent=result.getData(i,'name');listItem.querySelector('.skip-logic-list-order').textContent=result.getData(i,'menu');listItem.querySelector('.skip-logic-detail-view-link').addEventListener('click',openDetailViewOnClick(result.getRowId(i)));listContainer.appendChild(listItem);}};varlistViewCallbackFailure=function(error){console.error(error);};document.addEventListener('DOMContentLoaded',function(){odkData.getViewData(listViewCallbackSuccess,listViewCallbackFailure);document.getElementById('wrapper').classList.remove('d-none');});})();
The HTML and JavaScript files also depend on a few more files. For convenience, the example reuses CSS and image files from the Trying Out ODK-X Tables. Open up a default Application Designer and copy the following files to this application's directory (using the same directory paths):
A Detail View will display the details of a record. It is commonly used alongside List View to provide options to browse through a data set and learn more about a particular record.
Open or create app/config/tables/SkipLogic/html/SkipLogic_detail.html. Ensure the file looks like this:
This HTML file should define the user interface elements that will be populated by database calls in the JavaScript. Open or create app/config/tables/SkipLogic/js/SkipLogic_detail.js. Ensure its contents look like this:
As with the List View, this view requires a separate CSS file. Copy the following file from a default Application Designer, maintaining the directory path in this application's directory:
The .xlsx form should be updated to indicate the default view type, and where to find the HTML files for Detail View and List View. Open app/config/tables/SkipLogic/forms/SkipLogic/SkipLogic.xlsx and add a new worksheet titled properties. The worksheet has the following headers: partition, aspect, key, type, and value.
Add the following rows to set your List View and Detail View default files:
Follow the example above to create your tables properties worksheet. See Properties for more details about specifying custom HTML files.
The .xlsx should be run through the XLSX Converter again (Generating formDef.json) to update the configuration.
After that, you can deploy your app to your device. Open Survey and fill in a few Skip Logic records. Then, open Tables and select the Skip Logic table. This should automatically launch the List View defined above. Tapping an item in the List View should launch the detail view.
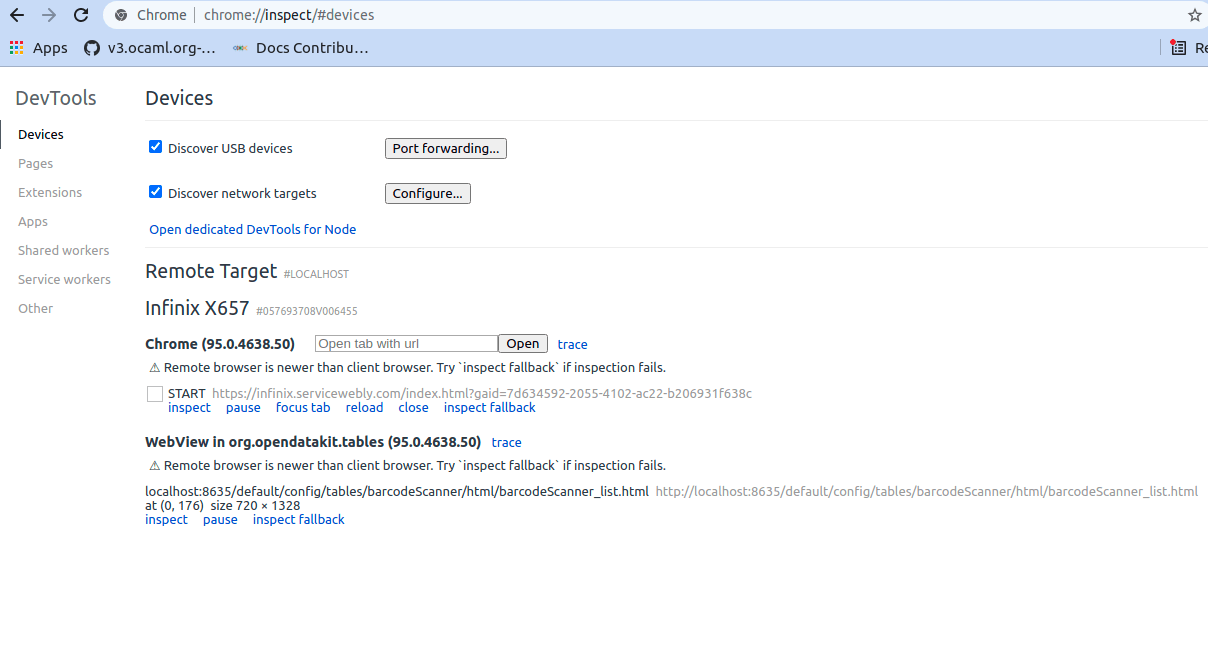
You can use the Chrome browser on your computer to inspect for devices and connect to this custom screen on your Android device and debug from there. For this, you will need to set up remote debugging with the instructions found in the guide on Remote debugging Android devices using Chrome DevTools and perform the following steps.
Open up the ODK-X Tables app on your phone.
Select the table (census table created above for example) you want to debug.
Open chrome://inspect page on your computer’s Chrome browser. Since the ODK-X Tables application uses WebViews to display your custom web pages, the inspect tab should list debug-enabled WebViews on your device. From the list, you should see the ODK-X Tables app WebView as shown in the figure below.
Click inspect below the table WebView you want to debug.
The edit-debug cycle is awkward because you must make the HTML or JavaScript change on your computer then push the change to your device, and reload the page (for example, by rotating the screen). When you do rotate the screen, however, it is rendered in a new web page, necessitating connecting to that new page to resume debugging (the prior page sits idle and will eventually be destroyed. If you don't see any activity, it is likely because you are pointing at the wrong web page. Return to inspect devices, and select the newest page).
Note
If your default view is a spreadsheet view, ODK-X Table WebView will not show up in the Chrome inspect tool.
You will need to change the default view type to LIST using the instructions found in Changing View Types: The Lined Paper Button.
As with ODK-X Survey, you can use the JavaScript Console to look for and fix errors in your HTML/JavaScript. If you are having trouble please check on the ODK-X Forum. Keep in mind that the debug objects only emit a subset of the data in your ODK-X Tables database.
You must have USB debugging enabled on your device in order to perform this step. See these instructions for help.
There are several times during app development when you will need to push and pull files to and from your device.
The push command is used to push the entire app directory to the device.
The pull command is used to pull the database or exported CSVs from the device to the desktop computer.
Tip
Exported CSVs can be used to set up tables.init to load test data.
Grunt tasks have been written in Gruntfile.js that perform these operations for you.
These commands can be run anywhere within the ApplicationDesigner directory.
grunt adbpush: Pushes everything under the app directory to the device.
grunt adbpull-db: Pulls the database from the device to the PC.
grunt adbpull-csv: Pull the exported CSVs from the device to the PC.
The pull commands will place the pulled content in the app/output/ directory.
The database is a SQLite database and can be viewed using SQLite Browser. This tool can also be used to view the content of the database used by Chrome on your computer (the location of that file is OS-dependent).
If you pull the CSV files, they will be under the output/csv/ directory. You can then copy them to the config/assets/csv/ directory and set up the tables.init file to read them in order to provision test data for your development effort. If you need any of this data in production, you will want to sync to a server, then export the CSV files and copy them to the config/assets/csv/ directory so that they have all of their metadata field values populated.
Tip
Running grunt adbpull will perform all the pull tasks.
Tip
There are a number of additional grunt tasks available. Assuming you have installed grunt and node, you can view the available tasks by running grunt --help anywhere in the repo.
grunt adbpull : Perform all the Android Debug Bridge pull tasks.
grunt adbpull-logs : Pull any logs stored in the device for debugging purposes.
grunt adbpull-csv : Pull any exported CSV files from the device.
grunt adbpush : Perform all the Android Debug Bridge push tasks.
grunt addtable:tableid : Will create the required directory structure for an individual table, including the forms directory.
grunt clean : Wipes the device of all ODK-X data.
grunt empty : Remove unnecessary files to make an empty app-designer directory to work with.
grunt killall : Force stops survey, tables, and services on the connected device.
grunt setup : Launches the login and sync screen on the connected device.
grunt uninstall : Uninstall ODK-X tools from the connected device.
grunt xlsx-convert-all : Takes all .xlsx files and converts them into a formDef.json file. Can be used instead of the XLSX converter on the app designer.
There are several issues that may occur while trying to push your survey onto your device. Below are some common issues and tips and tricks to help:
Try checking adb -version. If the version does not show, make sure that Android SDK is appropriately installed on your computer because this is what installs the Android Debug Bridge (adb) software.
Check that your computer sees your device. Enter adb devices in the command line. Should show a device detected.
Check the device to see if it has a message about authorizing the computer. If so, authorize the device.
Check the device settings to ensure USB debugging is enabled and that the device is linked as a media device (not camera or other settings)
Make sure your app-designer only has the necessary working files. Any random files or older versions of your survey saved within app-designer will cause the push to fail.
Do not have any Excel forms open on your computer. If you do, this will cause errors with $filename or ~$filename in the file path when pushing.
Check that your computer sees your device. In your command window type the command adb devices. It should show a device detected.
To update any app-level or table-level files, or to modify the database schema (like adding a new field to your form that adds a database column), you will need to reset the app server. Make the changes on your PC as normal, push them to the device, and reset the app server.
Warning
Resetting the app server will start a new data set. If you want to keep the old data, you should download it to a separate database.
To update versions:
You need to download the new app designer and delete the unneeded default files using
$ gruntempty
Then copy over your entire config/assets from your previous version to the new one. If you have customized anything in framework you'll need to copy that too into the config/assets of the new version, but in case ODK-X has also updated it, you'll need to manually merge both copies. Finally, re-convert everything using
$ gruntxlsx-convert-all
and your app designer should be set. You will also need to update the software on Android devices and the server to the same version as well.